Building an Electric Jet Engine
Safety first
- Exercise extreme caution when working with high-speed rotating parts.
- Be aware of the dangers of combustion and hot exhaust from the jet engine; it can burn equipment and cause injury.
- Do not place glass or other fragile materials directly in front of the jet engine exhaust.
- Always wear safety glasses when operating the engine or performing related tasks.
- When drilling, cutting, or welding 'empty' fuel tanks, always assume there might be explosive fuel residue and air. Fill the tank with water or an inert gas after emptying to prevent injury from potential explosions.
Tools
- 3D printer
- Spot welder (homemade)
- High voltage generator (cheap)
- Skateboard (optional)
Parts & materials
- 2 Butane canisters
- 1 3D printed compressor
- Butane gas (fuel)
- Thin sheet metal (for combustion chamber)
- 1 Electric motor (for compressor)
- 1 piece Metal straw (from Ikea, for spark plug)
- Metal wire (for spark plug)
- Blaster (for spark plug insulation)
- 1 Battery (more powerful)
- 1 Fuel tank (bigger)
Steps
Step 1 · 0:01:31 in the video
Empty two butane canisters to use as the body of the engine.
⚠ Working on 'empty' fuel tanks can be dangerous due to residual fuel and air forming an explosive mixture. It is recommended to fill the tank with water or an inert gas before performing hot work (drilling, cutting, welding).
Step 2 · 0:02:51 in the video
3D print the compressor, as it operates in the cold part of the engine.
Step 3 · 0:04:05 in the video
Build a spot welder to create the combustion chamber.
Step 4 · 0:05:04 in the video
Cut templates from thin sheet metal and spot weld them together to form the annular combustion chamber.
Step 5 · 0:06:48 in the video
Build a simple spark plug for igniting the air-fuel mixture.
Step 6 · 0:07:11 in the video
Conduct initial tests of the assembled jet engine.
⚠ Do not place cameras or sensitive equipment directly behind the engine exhaust during operation, as it can cause damage. Always wear safety glasses when operating the engine.
Step 7 · 0:08:50 in the video
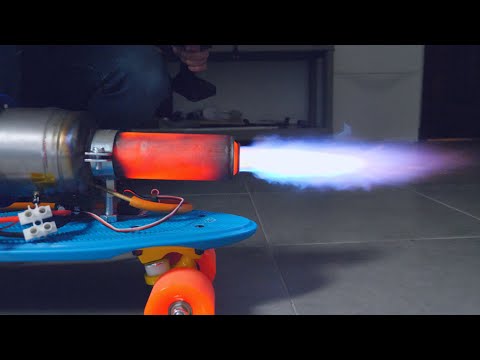
Mount the jet engine onto a skateboard to test its thrust.
Step 8 · 0:11:49 in the video
Make modifications to the engine to improve performance, including a bigger inlet port, a more powerful battery, and a larger fuel tank.
Tips from the comments
- To safely film the jet engine exhaust without damaging equipment, use a mirror placed at an angle downrange to reflect the view to the camera.
- After cutting fuel to the engine, continue spinning the compressor fan for a few moments to run air through the engine, aiding in cooling and prolonging its lifespan.
- Implementing a restriction or a specific nozzle design (like a CD nozzle) at the exhaust port could significantly increase the escaping gas velocity and thus the thrust output.
- To increase thrust and lower noise, consider adding a bypass system to allow some of the intake air to bypass combustion and mix back in with the exhaust, similar to how turbofan engines operate.
- For better control over combustion, explore digital fuel and air mixture control, moving beyond analog methods to something akin to rocket EFI.
- When drilling, cutting, or welding 'empty' fuel tanks, always assume there might be explosive fuel residue and air. Fill the tank with water or an inert gas after emptying to prevent injury from potential explosions.
- The soldering material used to fix the fuel inlet tube to the housing appeared to be melting at 8:49, which could indicate a structural weakness or improper material choice for high temperatures.
- The engine shown in the video's introduction is a turbofan, where most thrust comes from the front fan, not just the exhaust. This differs from a pure turbojet.
- A useful video idea would be to build a thrust measurement setup to characterize the homemade jet engines and compare different designs.
- Consider using a microcontroller like a Pi Pico to control both propellant amount and inducer speed via a single potentiometer for more precise digital control.
- Upgrade the engine by testing different fuels, higher pressures, and varying fuel outlet sizes to optimize performance.
- An afterburner could be added to the jet engine for a significant boost in thrust.
Have a repair video of your own?
Make your own guideMade from this YouTube video.
AI-generated from the video — double-check before you start. See Terms.